![[+] – zer0space.html – [+]](http://zer0space.me/wp-content/uploads/2025/04/zzz.png)
INTRO TO PYTHON
Python is one of the most popular and beginner friendly programming languages in the world. For starters, a vast majority of pentesting tools you will find on GitHub are written in python. Whether you’re hoping to automate boring tasks, scrape and analyze data, or start building and customizing your own tools, Python is a great place to start. It is especially helpful for those who have never touched a programming language and want to learn because it is very beginner friendly. What exactly is it, though?
Come on. I’ll show you.
This will be a longer post, so if you’d like to jump ahead:
[+] – What is python? – [+]
Python is a high-level programming language, which means it is written in a way that can be easily read and understood by humans. Some other examples of high-level programming include JavaScript, Ruby, and PHP. Learning to program is quite literally like learning a new language. You can look up syntax and commands, but you will need to practice. As someone with personal experience, Python was a really easy language to catch on to, at least as far as syntax. The main challenge is learning to think in a Pythonic, or object oriented way. One benefit of its popularity is the massive community. You can find tutorials on YouTube or TikTok, free courses and writeups, and even one on one training. I got started by enrolling in the free CS50: Introduction to Programming with Python. The lectures walk you through each topic step by step in a way that not only teaches the syntax, but also explains why we do it this way. Each week also includes homework assignments that give you a chance for some hands on practice with what you learned that week.
I am not affiliated with Harvard University or any other resource I list here. These are just resources that I personally found helpful. This guide is meant for those with little to no Python or programming experience. We will start by building up your knowledge base step by step. You will write your first Python program, and by the end of the post, hopefully you will understand how variables, loops, functions, and Pythonic thinking all fit together.
Without further ado, lets get started!
SETTING UP PYTHON
Before we start writing code, we need to make sure Python is installed on your computer. Linux and Mac users may already have Python installed. To check, open your terminal (Mac/Linux) or Command Prompt (Windows) and type this command:
> python --versionOR
> python3 --versionIf you see something like “Python 3.11.5,” you’re all set. If not, it is pretty simple to install. Windows and Mac users can download and install Python here. When running the installer, make sure you check the box that says “Add Python to PATH.” This is important as it will allow you to run Python code system wide from any folder or location. If you are using Debian/Ubuntu based Linux distributions, the simplest way to install Python is to type the following commands into your terminal.
> sudo apt install python3
> sudo apt install python3-pipPython files will end in the extension .py. We can create a python file in literally any text editor, but here are some of the more popular ones.
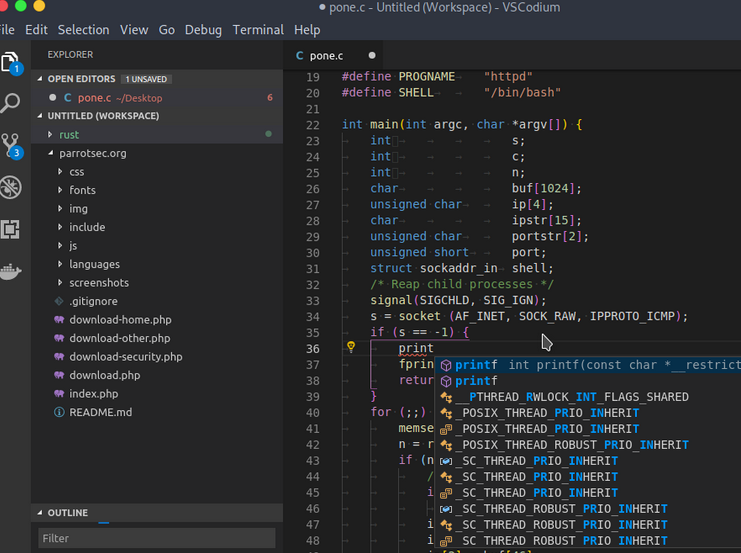
The most common professional grade IDE (Integrated Development Environment) is VSCode (top) by Microsoft. If you prefer open source programs, you can check out VSCodium (bottom), which is identical to VSCode but without the telemetry. This is a good option if you plan to use other languages besides just Python. VSCode allows you to install extensions for JavaScript, C++, and most other languages. One thing I like about VSCode is that is highlights parts of the code based on formatting, like all functions being blue for example. If you choose this option, be sure to install the Python extension inside of VSCode.
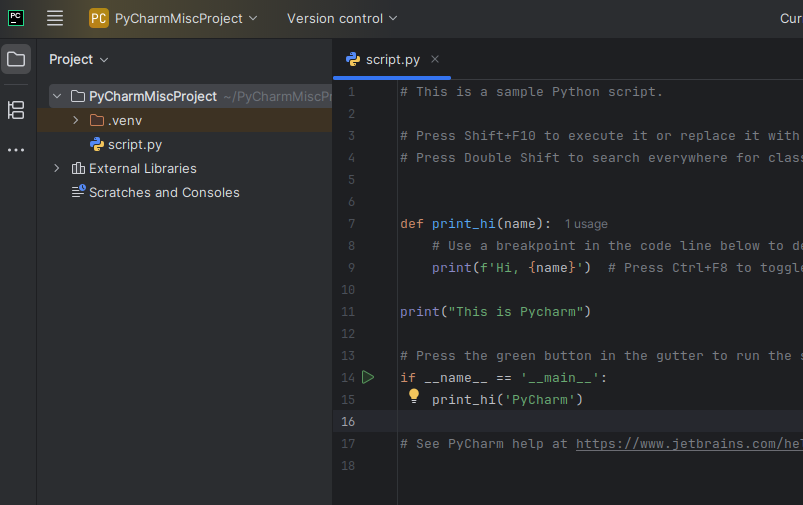
Another option is PyCharm. This is an IDE that is specifically designed for Python, though I think Jetbrains makes IDEs for other languages. All of these options are Integrated Development Environments, which means you can write the code and run the code in a terminal, as well as organize all your files and scripts, in one program.
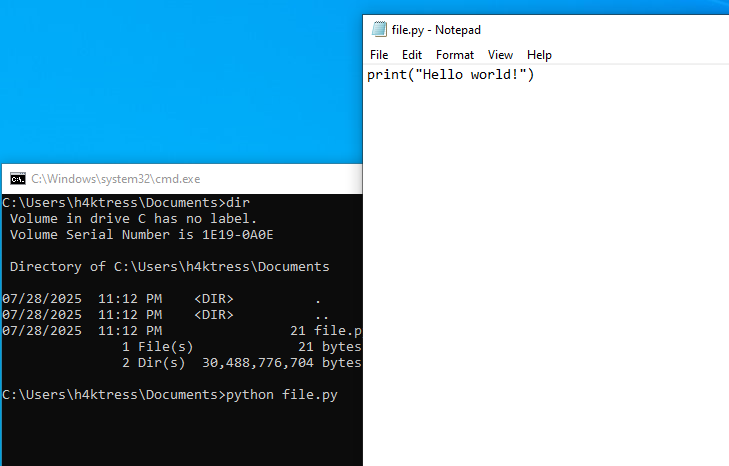
If you don’t like any of those options, you can use any text editor of your choice. You will need to create a folder for your files and save the document with the .py extension. To run your scripts, you will need to open a terminal or command prompt in the same folder as your script. To run your script, simply type:
> python file_name.pyI am also pretty fond of the Sublime text editor. Any option you choose will work just as well.
If you want to skip all that and just get started, you can find a browser based Python compiler here.
SYNTAX & DATA TYPES
Before we start coding, we need to understand the building blocks of Python, how Python stores information, and how to write code that Python can understand. Python is known for its clean, easily readable syntax, which means no curly brackets ( {} ) or semicolons ( ; ) are needed. Something to keep in mind regarding formatting and syntax is that indentation matters. Code blocks are grouped by indentation, usually the Tab key. If you do not properly indent, Python will give you an IndentationError when you try running your script.
IndentationError: expected an indented blockA variable is the name for a piece of data. We’ve all seen the algebra equations where you solve for x. Well, this is like that. To create a variable, you will need to list the name of the variable followed an (=) sign, then the value you’d like assigned to the variable on the right. One thing to note here is that a single (=) is how we assign values to a variable. If we want to compare whether two values/variables are equal, we need to use a double equals (==). A “pound sign” or “hashtag” (#) indicates a comment in the code. Anything after the # will only be visible in the code, it will not render once the code is run.
name = "Alice" # This is a comment
age = 25
height = 5.7You can think of variables as labeled boxes holding specific value that we can call on later. Variables can be anything you want. In the code below, we have name, age, and height, but we could easily have called them banana, raincloud, and ocean, though that would not be very descriptive. It is good practice to name variables descriptively, both for your sake and for the sake of anyone reading your code. In the above code snippet, notice that we have a few different types of information here. We have the string (str) “Alice”, the integer (int) 25, and the decimal, or float (float), value 5.7. These pieces of data will be handled differently, so it is important to know the most common data types in Python.
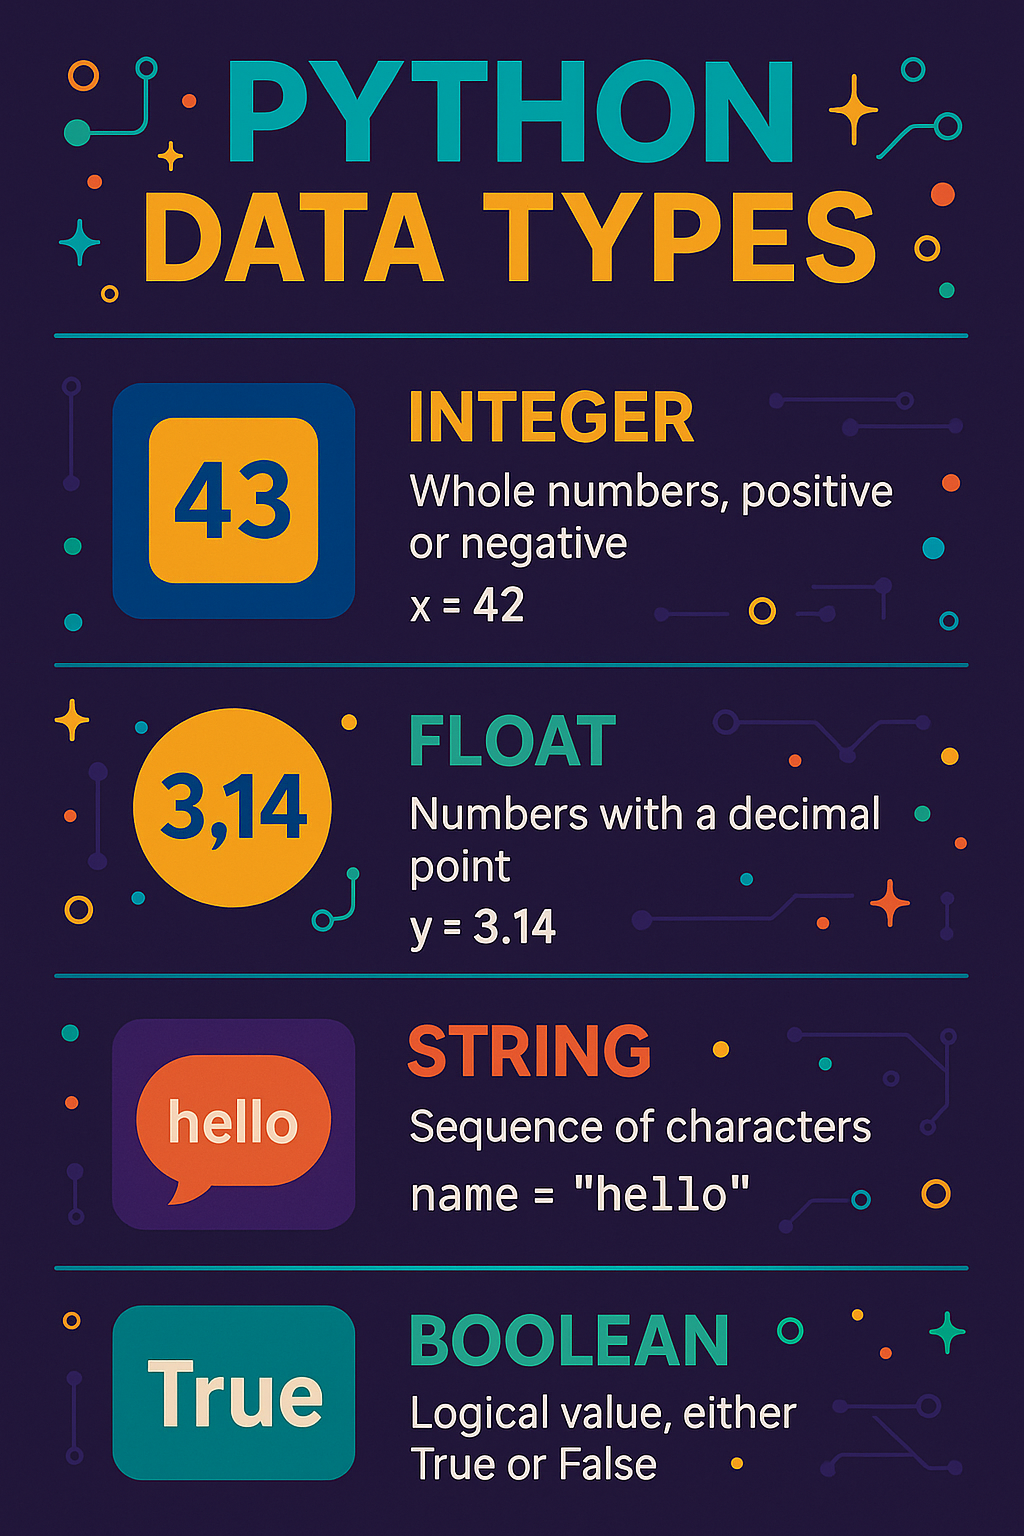
The most common data types you will encounter are as follows:
- str (string): a string is simply a sequence of characters, e.g. “alice”, “123”, etc
- int (integer): integers represent whole numbers, which includes positive numbers, negative numbers, and zero
- float (decimal numbers): decimal or fractional integers
- bool (True/False): a boolean operation is one that returns either True or False
Python is comprised of a series of functions, some of which are included with Python and others you can define for yourself (we will get into that later). Functions perform some operation or series of steps on a variable. You can check the type of any value using the type() function:
print(type(name))
>> <class 'str'>
print(type(age))
>> <class 'int'> Functions in python can be layered or stacked inside of one another. In the example above, we can see the type() function inside of the print() function. Python interprets these kind of functions from the inside out, so this code will print(), meaning display on screen, whatever the result of type(name) function is. Since we assigned the string “Alice” to the variable name, we can mentally replace name with “Alice”, so we have type(“Alice”). Since “Alice” is a string (str), this code will print <class ‘str’>. Most functions will be listed with the name of the function followed by parentheses, inside of which is the data that the function will act on. Makes sense, right?
This all felt super overwhelming for me at first as well. Don’t worry. I got you BooBoo!
WORKING WITH INTEGERS
x = 5 + 5
y = 10 - 5
z = 20 / 10
a = 5 * 2

print(x)
print(y * 2)
print(x + y + z)Integers in Python work similarly to basic algebra. Like the calculator on your phone or PC, Python uses the basic addition (+), subtraction (-), multiplication (*), and division (/) signs for doing math. A quick note on division in Python – a True Division operator (/) may result in a float() value, which just means it is not a whole number. If you want to truncate the decimal part, you would use the Floor Division (//) operator.
Looking at the code above, we are assigning whatever the value of 5+5 is (10 in this case) to the variable x, the value of 10-5 to y, and so on. Python usually interprets from the top down, so once the values of x, y, z, and a are assigned, the value of x (10) is printed, or displayed on the screen. One thing to note is that you can use multipliers with variables as well. Here, we are taking the value of y (5) and multiplying it by 2. Since y is an int(), the next line will print the number 10 ((10-5)*2). This format works with other data types too. If y was a string, say “Alice”, this line would print the word “Alice” 5 times. If it was a list, it will print the list items 5 times, and so on.
We can also make equations with variables. Take a look at the last line. This line is going to print whatever the value of x + the value of y + the value of z, which in this case is 17 (10+5+2).
We can’t cover everything we can do with integers in this post, but we can do a lot more than just basic arithmetic. Lets look at some other operations we can do with integers. For a full list of integer functions, check out the Python documentation on integers.
# A FEW OTHER MATH OPERATORS

a % b # This will return the remainder of a / b (12 % 5 = 2)
int(3.5) # Turns 3.5 into an integer (3)
a ** b # Returns the result of a to the power of b
abs(-a) # Returns the absolute value of a
round(number, ndigits) # Rounds number to to ndigits decimal places
x > y # Returns True if x is greater than 7
x == y # Returns True if x is equal to y
x != y # Returns True if x and y are not equal (This is a ! and = if you can't see it)

# CONVERSION FUNCTIONS

int(x) # Converts x to an integer
str(x) # Converts x to a string
bin(x) # Converts x to a binary string
hex(x) # Converts x to a hexadecimal string
sum(iterable, start=0) # Sum of items in an iterable starting with start valueWORKING WITH STRINGS
One of the most common data types you will work with in Python is str(). A string is a series of characters. This can be any letter, number, or symbol you’d like so long as the string is enclosed with quotes (see above code). There are a LOT of ways to manipulate strings in Python. Lets start with the code below.
first = "Alison"
last = "Wonderland"
age = 25
multi = """This is
a multi-line string."""
hah = "haha"

print(hah * 3) # Output: hahahahahaha
print(first + " " + last) # Output: Alison Wonderland
print("Your age is " + str(age)) # Converts age to string. Output: Your age is 25
print(multi) # Output: This is
             #a multi-line string.
print(f"My name is {first} and I am {age} years old.") # Output: My name is Alison and I am 25 years old.
We have assigned values to a few variables – first, last, age, multi, and hah. Once those values are assigned, we have a few print() functions that look a little different that we’ve seen so far. As I mentioned in the integer section, we can use arithmetic operators on strings as well. The first print function takes the value of the variable hah and prints it 3 times to get “hahahahahaha.” We could also quote a string directly in the print function, so print(“string” * 3) would display “stringstringstring.”
Following that, we have a few ways to format strings. When we use the (+) with strings in a print() function, this is called concatenation, which is a fancy way of saying “putting stuff together.” This function prints the value of first, followed by an empty space (” “), followed by the value of the last variable. If we run this code, we will get “Alison Wonderland” for that line. It is important to note that you cannot concatenate different data types, so if you wanted to print a string followed by an integer, you’d have to convert the integer to a string (str(integer)).
Next we can see a multi-line string. Python gets pretty picky about formatting, so if you assign a value to a variable on two separate lines, you will get an error message. There is an exception to this rule. If we surround our string with three quotes in a row (“””), this will tell Python that this variable takes up two different lines. “This is” will print on one line and “a multi-line string.” on the line below it. You can also place a \n at the point within the string where you want to add a line break.
The last print() function is called an “f string”. Its just an easy way of formatting the output of your print() function. To do this, just add an f before the quotes. Once you do that, you can add any variable by putting it inside of curly brackets {}. If you want to print a character(s) that Python would normally interpret as an operation (like a , or ” or ‘ or /), you can just add a backslash (\) before the character you want to print, e.g. print(“He said, \”Hi\””). The \ tells Python that we want to print the quotation mark character rather than close the string after the first “.
[+] – MANIPULATING STRINGS – [+]
There’s WAY too much we can do with strings in Python to list here, so lets go over some basics. For a full list, check out the Python documentation on string operations.
Outside of the normal format for functions, we can apply operators to objects using the format string.operator(). This will make sense in a bit. Lets look at some code.
string = " Hello, World! "

print(string.strip()) # Remove space from start & end of line -> "Hello, World!"
print(string.lower()) # Converts to lowercase -> " hello, world! "
print(string.upper()) # Converts to uppercase -> " HELLO, WORLD! "
print(string.startswith("H")) # Prints True if string begins with "H" Output here: False
print(string.endswith("!")) # Prints True if string ends with "!" Output here: False
print(string.replace("Hello", "Goodbye")) # Output: Goodbye, World!We can do a lot of fun things like join two strings together, separate a string, assign different parts to multiple variables, replace characters, and basically anything else you can think of. Lets look at a few more examples.
text = "apple, banana, cherry, 25"
words = text.split(",") # Split text into 4 strings at every comma & assigns list to words
joined = "-".join(words) # Join words with -

print(words) # Output: ['apple', ' banana', ' cherry', ' 25']
print(joined) # Output: apple-banana-cherry-25

len(text) # Returns the number of characters in text. Output: 25BOOLEANS
In Python, booleans are a fundamental data type used to represent the truth of a statement. They form the backbone of decision-making in code, helping to control the flow of programs with conditions, comparisons, and logical operations. A boolean (bool) will only ever return either True or False. Lets look at some examples.
x = 5 > 3
y = 10 < 7
z = 5 == 5

print(x) # Output: True
print(y) # Output: False
print(z) # Output: True

a = 3
b = 9
c = 20

print(a < b) # Output: True
print(a == c) # Output: False
print(a != b) # Output: TrueIn the code above, we start by creating a bool and assigning it to the x variable. If we print that variable by itself, the output will be the word True. Since bool is a subclass of int, True behaves like the integer 1 and False like the integer 0. Understanding how booleans work, and how Python interprets different values as true/false, is essential for writing effective and intelligent code. Whether you’re checking if a user is logged in, determining if a number is positive, or verifying if a list is empty, booleans make it possible to evaluate situations and respond accordingly.
CONDITIONAL LOGIC
Conditional logic allows your Python programs to make decisions. Using statements like if, elif, and else, you can write code that responds differently depending on whether certain conditions are true or false. This is how we can build programs in Python that adapt to user input, check for errors, or react to different situations. Conditional statements rely on boolean expressions to determine which blocks of code should be run. Conditional logic will form the basic infrastructure of your programs. Let’s look at how Python handles decisions step-by-step.
temp = 75

if temp > 70:
print("It's warm outside!")This is the basic if/then statement. First, we assign the value 75 to the temp variable. If that variable is greater than 70, which in this case is True, this code will print the statement “It’s warm outside!” Remember when I said that indentation is vital in Python? This is a good example. The print() statement is indented, usually by the tab key, Python knows that the code is dependent on the condition in the if statement. Most of the time, these statements will start with if and end with a colon (:). If your code is not formatted like that, you will likely receive an error when running the code.
Conditional logic becomes even more powerful when combined with comparison and logical operators. You can evaluate multiple conditions at once using and, or, and not, allowing your program to make more nuanced decisions. For example, you might want to check if a user is both logged in and has admin privileges or display a message if either a form is incomplete or a password is too short. We can chain conditions together as well, which will give your code the ability to reason about more complex scenarios just like we do in everyday decision-making. Here’s what it looks like in practice.
age = 25
has_ticket = True

if age >= 18 and has_ticket:
  print("Welcome to the concert!")
else:
  print("Sorry, you can't enter.")

is_raining = False
has_umbrella = False

if is_raining or has_umbrella:
  print("You'll stay dry.")
else:
  print("Hope the weather holds!")
In the first example, we are making a decision based on whether two things are true. If age is over 18 AND the has_ticket condition is True, Python will print “Welcome to the concert!” If either of those conditions is not True, Python will print “Sorry, you can’t enter.” In the second example, we have two variables, is_raining and has_umbrella. If a boolean expression/variable is listed by itself like that, the statement is asking if that variable exists or is True. In this case, Python will print “You’ll stay dry.” if either is_raining OR has_umbrella is True. If both statements are false, Python will print “Hope the weather holds!”
We can use this format to check multiple conditions in a clean, readable way using the keyword elif (“else if”). When an if statement evaluates to False, Python moves on to the elif block. If that condition is True, it runs that block and skips the rest. You can have as many elif statements as you need, allowing your code to respond to several different situations without stacking multiple if statements in a confusing way. This makes elif ideal for writing organized decision trees, such as grading systems, menu selections, or multi-stage checks. It always follows an if, and may optionally be followed by an else to catch anything not already handled.
score = 72

if score >= 90:
  print("Grade: A")
elif score >= 80:
  print("Grade: B")
elif score >= 70:
  print("Grade: C")
else:
  print("Keep practicing!")

# We can write this same code another way

if 70 <= score < 80:
print("Grade: C")We can also nest conditions inside of one another, though this can get pretty confusing. Each condition should follow its own indentation and formatting so that the code can be easily interpreted by humans, and also so we don’t get any errors.
username = "admin"
password = "1234"

if username == "admin":
  if password == "1234":
    print("Access granted."
  else:
    print("Wrong password")
else:
print("Invalid user.")[+] – COMMON MISTAKES IN CONDITIONAL LOGIC – [+]
When learning conditional logic, there’s a few key issues where beginners often stumble – like accidentally using = (assignment) instead of == (comparison), forgetting colons at the end of if or else lines, or misusing indentation. Since Python uses indentation (spaces or tabs) to define blocks of code, every line inside an if, elif, or else must be consistently indented to avoid syntax errors. It’s also important to write clear, readable conditions—combining too many and/or operators in one line can make logic hard to follow and debug. Keep conditions simple and break them into separate checks when needed.
# Assigns the value 10 to the variable x
x = 10
if x = 5:
  print("This will cause a syntax error."

# Compares the value of x with 5
if x == 5:
print("This will not print because x is not equal to 5, but the code will run.")Best Practices:
- Keep conditions clean and readable
- Use parentheses for clarity when combining conditions
if (age > 18 and has_id) or is_vip:
print("Access granted")- Use descriptive variable names to make logic self-explanatory
- When in doubt, break complex conditions into multiple steps
LOOPS: REPETITION WITH PURPOSE
While conditional logic allows your code to make decisions, loops let it repeat actions—an essential part of programming. Loops are essential for automating monotonous or repetitive tasks whether you’re processing a list of items, counting down a timer, or prompting a user until they give a valid answer. This is also how we can parse through massive amounts of data, like checking or sorting a list of 10,000 usernames, for example.
Python offers two primary loop types: for loops for iterating over sequences, and while loops for repeating a thing until a condition is no longer true. Both types rely heavily on boolean logic. Lets look at a few examples.
# Basic 'for' loop
for i in range(5):
  print("Loop number", i)

# Output
>> Loop number 0
>> Loop number 1
>> Loop number 2
>> Loop number 3
>> Loop number 4

# Basic 'while' loop
count = 3
while count > 0:
  print("Counting down:", count)
  count -= 1

# Output
>> Counting down: 3
>> Counting down: 2
>> Counting down: 1A for loop is used when you know the number of iterations or are iterating through a sentence or string. In the first bit of code above, we start the loop with ‘for’ and end the line with a colon (:) like we did with if/then statements. The range() function here tells us how many times we will loop through the following code. You can specify a start/stop point as well as an increment by adding a range(start, stop, step). For example, range(0,10,2) will go from 0 to 10 in increments of 2, so 5 iterations total. We are assigning a variable i to each iteration in range(5), then printing that variable each iteration. This variable can be anything you like, so long as you are consistent. This loop will start by assigning the number 0 to the variable i, then printing “Loop number 0,” then it will assign the value 1 to i and print “Loop number 1” and so on until we get to 5 iterations. Note: Python starts at 0 rather than 1, so range(5) will stop at i=4.
A while loop is used when the end condition is not known. This will iterate through a set of code so long as a set condition remains True. In the code above, we start by setting the variable count to 3. While count > 0, this code will print the string “Counting down:” along with the current value of count. The last line will subtract 1 from the current value of count and then assign that number to count. We can use the characters (-=) or (+=) as a shorthand for count = count – 1 or count = count + 1
# count += 1
count = count + 1

# count -= 1
count = count - 1For more information on loops in Python, check out the documentation here. This article is meant as a basic overview to get you introduced to the syntax for Python. Lets look at a few more tools we can use with loops.
# Continue - skips to next loop iteration
i = 0
while i < 10:
    i += 1
    if i % 2 == 0:
        continue  # skips even numbers
    print("Odd number:", i)

# Break - exits the loop entirely
while True:
    command = input("Type 'exit' to quit: ") # Input() accepts user input
    if command == 'exit':
        print("Exiting loop.")
        break # exit loop once a condition (user types 'exit') is met
    print("You typed:", command)

# Pass - placeholder, 'do nothing for now'
x = 0
while x < 5:
    if x == 2:
        pass  # placeholder — does nothing here
    print("x is:", x)
    x += 1

# Nested while loops
i = 1
while i <= 3:
    j = 1
    while j <= 2:
        print(f"Outer loop: {i}, Inner loop: {j}")
        j += 1
i += 1There is a LOT we can do with lists, which is what makes Python such an amazing tool for automation. You can see how we can iterate through massive amounts of data very quickly
[+] – ACCEPTING USER INPUT – [+]
So far, we’ve written Python programs that run from start to finish without any user interaction, but real programs rarely work that way. Enter the input() function. This is the fun bit, the first tool for making interactive code from a basic calculator to a web game or the next PC shooter. Ok, so maybe that was a tad hyperbolic, but the user input is what makes your code a usable tool. With input(), your program can pause to wait for the user to type something, then use that input to make decisions, perform calculations, or personalize output. This is what makes your code dynamic and interactive. Think comment boxes or login forms or contact forms.
# Basic input function; assign input value to 'name'
name = input("What is your name?: ")
print(name)

# Using input function in if statements
# input() function is a string by default; must convert to int to use as int
age = int(input("How old are you? "))
if age >= 18:
    print("You're an adult.")
else:
    print("You're not an adult yet.")

# Repeat until secret word is guessed
secret = "python"
guess = ""

 # Will continue to prompt user to guess the word as long as secret != "python"
while guess != secret:
    guess = input("Guess the secret word: ")

 # Once the user enters "python", the loop breaks and continues through the code
print("You guessed it!")


# Basic menu code
while True:
    print("\nMenu:")
    print("1. Say hello")
    print("2. Say goodbye")
    print("3. Quit")

    choice = input("Choose an option (1-3): ")

    if choice == "1":
        print("Hello!")
    elif choice == "2":
        print("Goodbye!")
    elif choice == "3":
        print("Exiting the program...")
        break
    else:
print("Invalid choice. Try again.")For more information about the input() function, check out this link.
INTRO TO FUNCTIONS
As your Python programs grow, you’ll notice some code starts to repeat or becomes too long to manage easily. That’s where functions come in. A function is a reusable block of code that performs a specific task. Instead of rewriting the same instructions over and over, you can define a function once and use it whenever you need it. Functions make your code cleaner, more organized, and much easier to read and debug. Python has many built-in functions that we’ve already used like print() and len(), but you can also write your own functions. Lets look at some examples.
You will define your functions at the top of your python code. You can give the function any name you’d like, though you should probably use descriptive names to make things easier for both you and anyone else reading through your code. To define a function, we will start with the keyword def, followed by the name of the function. Don’t forget to indent all of the code you want to include inside of your function!
def greet():
    print("Hello there!")

greet()

                                                                                          # # OUTPUT
                                                                                          .                                                                                                                                      >> Hello there!
In the code above, we have defined a very basic function, greet(). This function is pretty simple. When it is “called”, or referenced later in the code, it will print the string “Hello there!” So we first define the function using def, making sure to format and indent just like you see there, but nothing you put inside that function will happen until the function is called later in code. Functions can be as long or short as you like and can be called as many times as you need. Lets look at some more examples.
def greet_user(name):
    print(f"Hello, {name}!")

greet_user("Thea")
greet_user("Alex")
In this function, we are including a variable within the definition, name. These are local variables that only apply to that specific function. Think of the function as a sort of miniature Python program with regards to variables. This function takes the variable that it is given, which we have decided to call name here but it could be literally anything you like, and prints a formatted string using that variable. When we call the code later, we are providing the greet_user() function with the string “Thea.” Putting a string or variable inside of the function when it is called tells Python that we want to substitute whatever is in the parentheses for the variable defined in the function above. Sounds complicated, but I promise you it is easier than you think. Since we want the function to act on the string, “Thea”, we can replace the name variable with the string “Thea” in the function, so everywhere you see the variable name, Python will use “Thea.” So the first greet_user(“Thea”) function will print “Hello, Thea!”
There truly is no real limit when defining functions. They can be simple or complex. They can take strings or integers or even variables as input. Lets look at some examples where the data we want the greet_user() function to act on is not known using the input() function.
def greet_user(name):
    print(f"Hello, {name}!")

user = input("What is your name?: ")

greet_user(user)
In this example, we are first going to ask the user for input. We will store whatever the user types as a string in the variable user, then pass that variable into our greet_user() function. In this example, whatever the user types will replace the name variable inside our function, so if the user types “Jason”, the function will print “Hello, Jason!”
What if we don’t want the function do print anything, but return a value we can use later? To do that in Python, we can use the return command.
def add_numbers(a, b):
    return a + b # Returns a value + b value

result = add_numbers(5, 3) # Substitute 5 for a and 3 for b in add_numbers, store in result
print("The sum is:", result) # Print our new variable, result
We are defining two variables that will need to be passed to the add_numbers function, a and b. The function will take those variables, add them together, and return the result in whatever variable we specify, which in this case is result. This code will then print “The sum is: 8” because 5 + 3 = 8.
We can also use conditional logic and booleans inside of a function. Lets say we want to make a function that will tell us whether a value is an even number or an odd number. How do you think you would do that? Well, we can go back to our if statements. For a number to be even, it must be divisible by 2, which means that if we divide it by 2 we will have 0 remainder.
def check_even(number):
    if number % 2 == 0:
        return f"{number} is even."
    else:
        return f"{number} is odd."

print(check_even(4))
print(check_even(7))Recall in the section on integers that the % operator will give you the remainder of the left value divided by the right value. For a number to be even, it must be divisible by 2, so the number % 2 would equal (==) 0. We are using two equal signs here because we are determining equality rather than assigning value. So we will pass a value into the numbers variable. We will then divide that by 2 and choose what to do based on that result. If the result is 0, meaning nothing is left over when the number is divided by 2, we will return the string “{number} is even.” If the result is not 0, the number must be odd, so the check_even function will return “{number} is odd.”
If we pass the number 4 into the check_even function, then print the result, Python will print “4 is even.” If we pass the number 7, Python will print “7 is odd.”
Lets look at one more function. Lets say we have a function that will greet users by name, but we want to include a condition in case no value is passed into the function. We can do that in Python by including a default value in the definition of the function that will only change is a value is passed into the function.
def greet_with_default(name="friend"):
    print(f"Hello, {name}!")

greet_with_default()         # Uses default >> "Hello, friend!"
greet_with_default("Jordan") # Uses provided value >> "Hello, Jordan!"

user = input("Name: ") # Asks for user input; stored in variable 'user'
greet_with_default(user) # Passes whatever the user inputs into greet_wth_defaultIn this function, we are giving the variable we are using a default starting value, “friend”. If no strings or variables are passed into the greet_with_default() function, Python will print “Hello, friend!” If a string is passed through as it is above, Python will print “Hello, Jordan!” If you didn’t want to specify a value, like if you want to have users enter their own name, you can ask for user input with the input() function and then pass that value into the function. If the user does not enter anything, the function above will use the default value of “friend”.
LISTS & DICTIONARIES
When you’re learning Python, two of the most useful tools you’ll encounter are lists and dictionaries. Lists let you store items in a specific order — like a shopping list or a playlist — while dictionaries store data in key-value pairs, a bit like a real-world address book where each person’s name is the key and their contact details are the value. Understanding these two data types will make your programs more organized, flexible, and powerful. Lets look at some examples and go through the basics of creating, accessing, and updating lists and dictionaries, with plenty of simple examples you can try yourself.
[+] – LISTS – [+]
fruits = ["apple", "banana", "cherry"]
print(fruits)A list in Python is created by surrounding strings or integers that are separated by a comma ( , ) with brackets, [ ]. If your list contains strings of words like the example above, the strings must be surrounded with quotes as always. Like any other variable, we will assign the list to the variable using a single equals sign ( = ). The code above will simple print the strings “apple, banana, cherry”. Lets look at some ways we can manipulate or iterate through lists.
fruits = ["apple", "blueberry", "cherry"]

print(fruits[0])   # First item
print(fruits[-1])  # Last item

fruits[1] = "blueberry"
print(fruits)  # ['apple', 'blueberry', 'cherry']

fruits.append("mango")    # Add to the end
fruits.insert(1, "grape") # Add at position 1
fruits.remove("apple")    # Remove by value
print(fruits) # ['grape', 'blueberry', 'cherry', 'mango']

for fruit in fruits:
    print(fruit)

numbers = [1, 2, 3, 4, 5]
squares = [n**2 for n in numbers]
print(squares) # [1, 4, 9, 16, 25]Python starts counting at 0 rather than 1, so if we were to print the first item in the list, we would need to print fruits[0]. To print the last item, we would use fruits[-1] as we are counting from the end when using a negative value. If we type fruits[1], we will get the second item in the list, which in this case is “blueberries”.
We can also add or remove items to the list using the .append() and .remove() functions. In the code above, we are taking our list, which we have stored as fruits, and adding the .append() to it. Inside the parentheses, we will type the string we want added to the list. This method will append the item to the end of the list. We can also remove items, like “apple” for example, using fruits.remove(“apple”). If we want to insert an item somewhere into the list, we would use fruits.insert(), followed by the position and list item you want to add. In the code above, fruits.insert(1, “grape”) tells Python that we want to insert the string “grape” at position 1 in the fruits list.
If we want to iterate through a list, we can do that pretty easily in Python using the for. On line 14 in the above code, we are saying that we want Python to go through the fruits list and print each item, which we will name fruit. So for each fruit in the list fruits, we are going to print the string. For more on lists, check out the documentation here.
[+] – DICTIONARIES – [+]
person = {
    "name": "Thea",
    "age": 30,
    "city": "Seattle"
}
print(person)
Dictionaries are like lists, but rather than a simple group of items, the values are stored in key:value pairs. To make a dictionary, we will use curly brackets { } instead of normal brackets [ ]. Just like with lists, we can iterate through dictionaries, add or remove items, and update any items we wish. A major difference here is that dictionaries will have two values per dictionary item, a key and a value, separated by a colon ( : ). To print an item, you will need to use the key value in your print() function. In the code below, for example, when we type print(person[“name”]), Python will print the value associated with the key, “name”, which in this case is “Thea”.
person = {
    "name": "Thea",
    "age": 30,
    "city": "Seattle"
}

print(person["name"]) # Thea
print(person.get("age")) # 30
We can add new items, update existing values, and remove items from the dictionary using the item’s key.
person["email"] = "thea@example.com"  # Add new key-value pair
person["age"] = 31                    # Update existing key
print(person) # {'name': 'Thea', 'age': 31, 'city': 'Seattle', 'email': 'thea@example.com'}


person.pop("city")  # Remove by key
print(person)  # {'name': 'Thea', 'age': 31, 'email': 'thea@example.com'}
We can also iterate through items in a dictionary using the .items() method. In the following code, we will iterate through the person dictionary, assign each key and its value to the variables, key and value, then print the key:value pair as an f-string.
for key, value in person.items():
print(f"{key}: {value}")WHERE TO GO FROM HERE
We’ve covered some of Python’s basic building blocks, but this is only the beginning of what you can create. Everything here should give you the foundation to start writing simple programs, but Python’s real power emerges beyond the basics — especially in automation. Imagine automatically renaming files, sending emails, scraping data from websites, or organizing your photo library in seconds. Along the way, you’ve seen how to use if/else and for loops to work through large sets of data, convert between data types, manipulate strings and lists, accept user input, and use booleans and conditional logic to control the flow of your programs.
It may feel overwhelming now, but the goal of this post is just to get your feet wet. We’ve barely scratched the surface of what Python can do. Once you’re ready to dive deeper, you can explore topics like object-oriented programming, powerful libraries such as pandas and requests, frameworks like Flask and Django, or even building GUI-based tools.
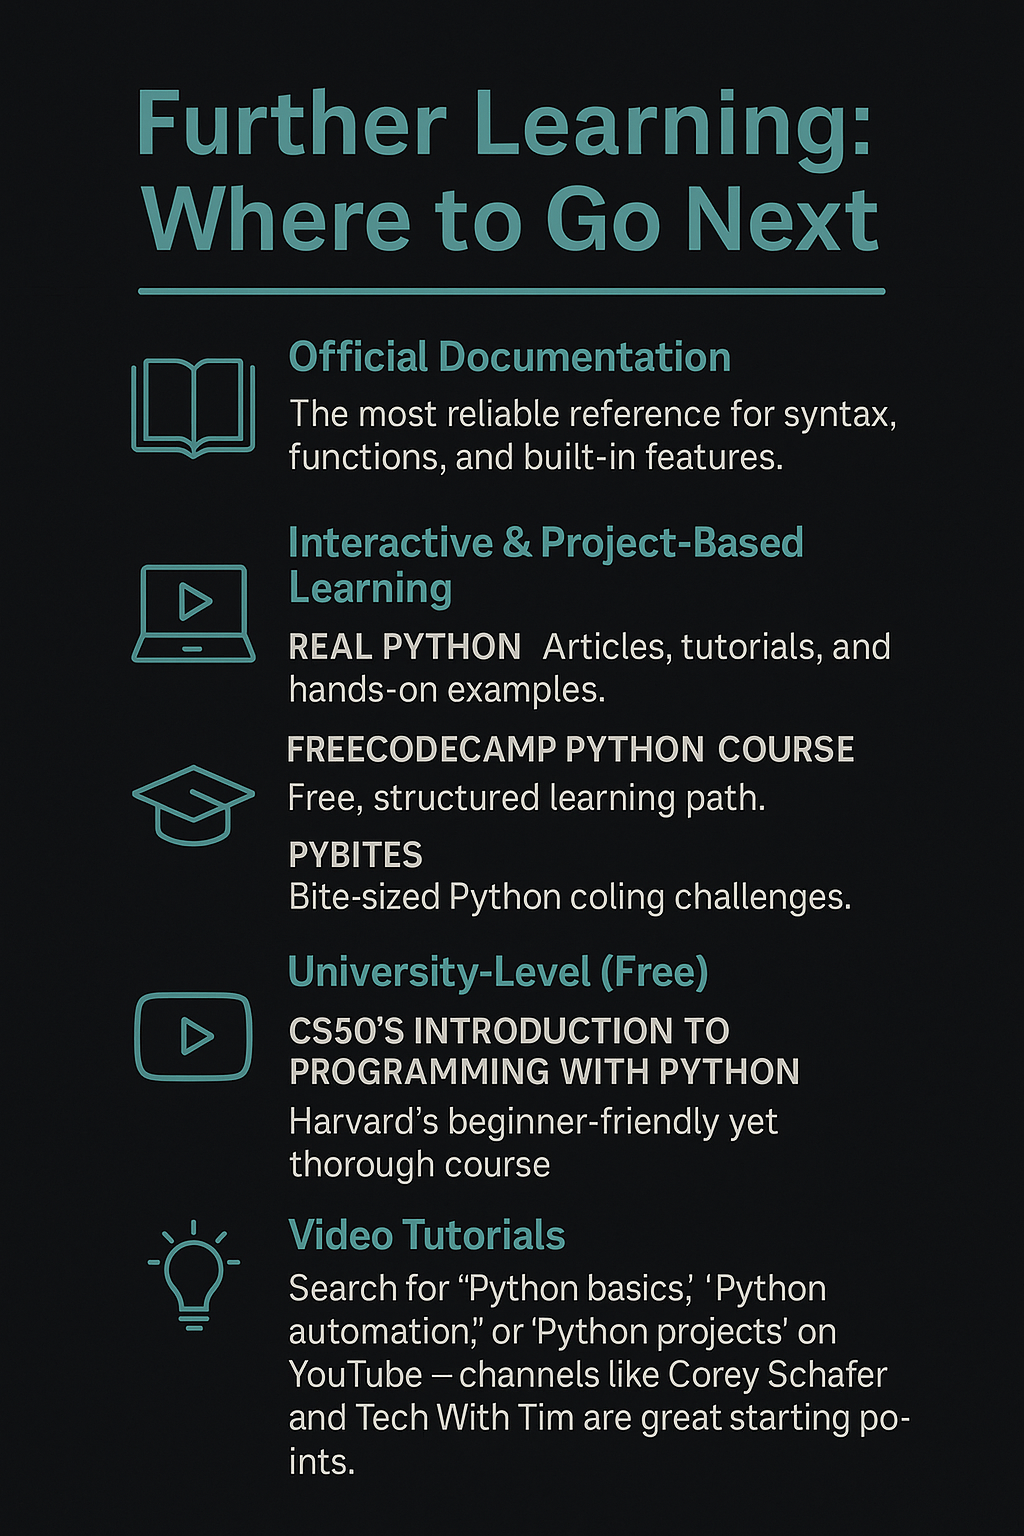
There’s no shortage of quality resources to guide your learning. The official Python documentation is always a good place to start. Courses on Real Python, freeCodeCamp, or PyBites offer beginner-friendly lessons and hands-on challenges. One of my personal favorites is Harvard’s free online CS50: Introduction to Programming with Python course – it’s clear, thorough, and combines video lectures with practical assignments, ending in a final project of your choice. If you’re a visual learner, YouTube has hundreds of excellent tutorials covering everything from basic syntax to advanced projects.
Each step you take builds both your skills and your confidence — and Python’s flexibility means there’s always a new direction to explore. Every expert was once a beginner. The best way to learn is by doing, so don’t just read about Python — open your editor and start coding. When I was in art school, I read that everyone has 10,000 terrible drawings inside them, and the only way to get them out is to draw often. The same is true for Python: it takes consistent practice to think the “Pythonic” way, but the payoff is worth it. As a hacker and pentester, Python isn’t just another skill — it’s a vital tool in your arsenal.
So embrace the process. Write code every day. Don’t be afraid to break things — every bug you squash and every problem you solve gets you closer to mastery. Every line of code sharpens both your logic and your creativity, skills that will serve you well in any hacking challenge or pentesting career. Get your reps in: write messy scripts, break things on purpose, and learn from the wreckage. In hacking, as in art, mastery isn’t about never failing; it’s about failing fast, fixing faster, and building the kind of Python skills that make you dangerous… in all the right ways.
If you want to code like a hacker, you have to think like a problem-solver — break it, fix it, automate it, and repeat until elite.